Select File | New... and choose Automation Object from the ActiveX page of the dialog. This produces the Automation Object Wizard dialog.

Click here to download the files associated with this paper.
If you find this article useful then please consider making a donation. It will be appreciated however big or small it might be and will encourage Brian to continue researching and writing about interesting subjects in the future.
Automation (which is Microsoft's new term for what used to be known as OLE Automation) is one facet of OLE (Object Linking and Embedding) which was originally designed to take over from DDE (Dynamic Data Exchange) in the area of information exchange.
Most application users' exposure to OLE is similar to their exposure to DDE, a way of inserting information from one application into some document in another application, with the information still editable (possibly in-place). The idea is that the information is represented as an object and either some information describing a link to the document object is inserted, or the whole document object is embedded. Hence the name Object Linking and Embedding. This side of OLE used to be known as compound document technology or OLE storage, but is now referred to by the term Active Documents.
There is a component in Delphi that allows you to set up such applications, called TOLEContainer. You can find out more from the demonstration program supplied in Delphi's DEMOS\OLECTNRS directory.
Automation is a separate aspect of OLE dedicated to allowing one application to control, or automate, another application. The application being controlled is called an Automation server, and the one doing the controlling is called an Automation controller or Automation client. The client establishes the link between the two applications.
Like DDE, Automation allows information to go backwards and forward between the applications, and also allows the client to cause functionality to be executed in the server. Unlike DDE (where there is a distinction between information topics and items), Automation is managed through objects. The server supports one or more objects that have properties and methods available to external applications. You can read and write properties, and you can call methods.
In order to invoke an Automation server, it must be registered, which means it must have information stored in the Windows registry sufficient to describe and locate it. This is another difference between DDE and Automation. A DDE client must rely on the DDE server being on the path, or must know where it resides. An Automation client need not care. The COM/Automation code in Windows will find where the server application resides by examining the registry (and it may end up residing on a completely different machine).
To start controlling an Automation server you ask the OLE support DLLs to create an appropriate object. In the case of Microsoft Word, you would create either a Word.Basic Automation object (for controlling the old WordBasic language) or a Word.Application object (for controlling the newer Visual basic for Applications or VBA language from Word 97, aka Word 8, and onwards). Once the OLE DLLs have given you the object, you can control it.
Word.Basic
Word.Application effectively represent the class that you are creating an instance of. This type of string is sometimes referred to as an OLE class name or class string, but is correctly termed (as far as OLE is concerned) a ProgID.
It's worth noting at this point that the Automation server can be an application (EXE) or a DLL. Because a DLL lives in the process address space of the EXE that uses it, a DLL servers is called an in-process server or in-proc server. An EXE server is called an out of process server or out-of-proc server since it will be in a completely separate address space from the Automation client. OCXs and ActiveXs are in-proc Automation servers with specific extra bits in to make them work as visual controls.
An Automation server is an application or DLL that implements a COM object. A COM object is an object that adheres to Microsoft's COM (Component Object Model) specification. COM objects implement various interfaces. Other applications or DLLs talk to the object through its interfaces. An interface is a well-defined collection of methods and properties that can be implemented by some object or objects. All COM objects implement the interface IUnknown, which defines the reference counting methods used to control the COM object's lifetime management. It also defines a method that allows other interfaces to be accessed in the COM object.
An Automation server is basically a COM object, which in addition to implementing IUnknown implements IDispatch. IDispatch allows an arbitrary automation client to execute functionality in the COM object. The client does this by passing information about which method or property to access, and any additional parameters, to methods of IDispatch. At run-time the relevant IDispatch method, Invoke, will endeavour to call the relevant routine whose details were passed along. This is a form of late binding. Applications that access COM object functionality directly through its other various interfaces use early binding and so are more efficient.
You can manufacture Automation server objects in Delphi that can have their interface methods and properties accessed either through IDispatch, or directly through their other interfaces. An Automation object that supports accessing functionality through both these routes is said to support dual interfaces.
Delphi supports controlling Automation servers either through their dispatch interface, or directly through any other interface you can get hold of. We will firstly examine the support for dispatch interfaces using variables of type Variant. A Variant variable can have values from a range of different types assigned to it and read from it. For example the following code is valid.
var
  V: Variant;
  I: Integer;
  S: String;
...
V := 'Hello';
V := 5.75;
V := Now;
I := 5;
S := V; //S now has '5' in it
In addition to being able to store values with types including integers, reals, strings, Booleans and date-and-time values, a Variant can also be used to hold an array of values, with any specified number of dimensions and elements of a chosen type (which can include type Variant). Its other use is to represent a connection to an Automation object. An Automation object is a COM object that resides in a COM server application and implements an interface based upon IDispatch. A Variant can contain a reference to an IDispatch interface (the VarType System unit function would tell you its type is varDispatch).
To set one up, you need to use the ComObj unit, call CreateOleObject and assign the result to a Variant variable. The object will then be available until either the server application is closed by the user, you explicitly terminate it programmatically or the variant goes out of scope. The last point means that if you declare a Variant local to an event handler or other routine, then when the routine ends the connection to the Automation object will be released. If this is the last remaining reference to the Automation object, it will typically destroy itself.
CreateOleObject()
CreateObject() are used to connect to a new instance of the server's object (possibly in a new instance of the executable). To connect to an existing instance, you can call GetActiveOleObject() from comobj.hpp or call the GetActiveObject() method of the Variant, assuming the object has registered itself in the Windows ROT (Running Object Table).Let's test this out using Microsoft Word as the server. Make a new project and modify the uses clause as mentioned above, to include ComObj. Then declare a Variant called MSWord as a public data field in the form class. The project we are working towards is in the accompanying ZIP as WordEg.Dpr.
Put two buttons on the form called btnStartWord and btnStopWord and give them captions of &Start Word and S&top Word. Make OnClick event handlers for them as follows.
procedure TForm1.btnStartWordClick(Sender: TObject);
begin
  MSWord := CreateOLEObject('Word.Application')
end;

procedure TForm1.btnStopWordClick(Sender: TObject);
begin
  MSWord := Unassigned
end;
Assuming you have Microsoft Word 97 (or later) installed, pressing the first button should invoke Word. Activity on your hard disk should verify this, however Word will start up hidden. Since the program is being launching for programmatic access and not user access, it does not display its user interface. If Word is unavailable, CreateObject will raise an EOleSysError exception.
A point worth bearing in mind is that Microsoft Office applications that implement VBA (Visual Basic for Applications) do not seem to behave correctly with regard to terminating when they should. The COM specification dictates that a COM object should destroy itself when the last reference to it is released. This typically causes the hosting application (the COM server) to terminate. You will note that the Stop Word button fails to terminate Microsoft Word (use the Windows Task Manager to check).
Like most Automation servers, Word starts hidden when invoked under Automation control. If you want to see it, you will need to tell the Word object to show itself. In order to find out what methods, properties and objects exist, you must rely on some form of documentation from the server vendor (such as a type library, which is explained later). In the case of Word, the automation interface matches very closely the entirety of the VBA language.
Documentation of the VBA language specifics for Microsoft Word can be found in the Microsoft Word Visual Basic help file that is installed with a full Microsoft Office installation. For normal MS Office installations, it is not installed by default.
When we ask for a Word.Application object, we are given access to the published interface of the VBA Application object. Since this object has a Visible property, we can access it and assign a value of True to it. Follow the call to CreateOleObject with:
MSWord.Visible := True
Note that in contrast to accessing a real Delphi property (and the same applies for calling a method), the Delphi compiler will not try and verify that the Visible property exists. Instead, since it is called via a Variant, it will package it up and at run-time pass it over to the Automation object. If the property is invalid you will get an exception at run-time rather than a compile-time error.
Now add two more buttons called btnNewDoc and btnInsertText with captions of &New file and &Insert text) and a memo called memTextForWord to the form. Give this code to the buttons:
procedure TForm1.btnNewDocClick(Sender: TObject);
begin
  MSWord.Documents.Add
end;

procedure TForm1.btnInsertTextClick(Sender: TObject);
begin
  MSWord.Selection.TypeText(memTextForWord.Text);
  //An Automation method call, using two named parameters
  MSWord.Selection.InsertDateTime(
    DateTimeFormat := 'dddd, dd MMMM yyyy',
    InsertAsField := False);
  MSWord.Selection.TypeParagraph
end;
You should now find you can connect to Word, create a new document, and add some text along with the date into it. However, we still cannot disconnect from Word thanks to the aforementioned COM specification discrepancy. We can forcibly ask Word to terminate when the Stop Word button is pressed, using the appropriate VBA call. We should also take care to tell Word not to display any confirmation dialogs (such as asking if we wish to save the document). As Automation is programmatic access, anything that needs to be done should be done by the program, not by the user.
procedure TForm1.btnStopWordClick(Sender: TObject);
begin
  //Should be able to just use the 2nd statement
  //but MS Office 97 doesn't adhere to the lifetime
  //management aspects of the MS COM spec.
  MSWord.Quit(False);
  MSWord := Unassigned
end;
Depending how advanced the server is (Word is very advanced) the various properties available may return back more Automation objects that have their own methods and properties. In fact this happened in both the New doc and Insert text buttons, but the code did not make this particularly clear. To make it clearer, temporary Variant variables can be used, making the code look like this.
procedure TForm1.btnNewDocClick(Sender: TObject);
var
  DocCollection: Variant;
begin
  DocCollection := MSWord.Documents;
  DocCollection.Add
end;

procedure TForm1.btnInsertTextClick(Sender: TObject);
var
  CurrentSel: Variant;
begin
  CurrentSel := MSWord.Selection;
  CurrentSel.TypeText(memTextForWord.Text);
  //An Automation method call, using two named parameters
  CurrentSel.InsertDateTime(
    DateTimeFormat := 'dddd, dd MMMM yyyy',
    InsertAsField := False);
  CurrentSel.TypeParagraph
end;
So calling or automating an Automation server is easy enough as long as you know what methods and properties it exposes and what its ProgID is.
The process of writing an Automation server is very much automated itself, through an Automation Object Wizard. The goal in writing an Automation server is to define an appropriate class in an EXE or DLL. Certain methods and properties will be marked as available to Automation controllers thanks to them being defined in an interface. Once written, the Automation server will need to be registered, to allow Windows to locate it when needed.
Let's start by making a new application. By the time we finish this we will have the server acting rather like Word in that if it is started by a controller, the main form will not show up. So to remind us of this fact, place a large label on the form with a caption indicating that the server has been started normally. Now save the project (one is supplied in the accompanying ZIP as Server\Server.Dpr).
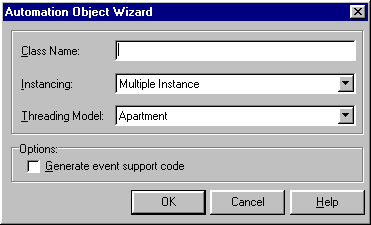
Select File | New... and choose Automation Object from the ActiveX page of the dialog. This produces the Automation Object Wizard dialog.
Figure 1: The Automation Object Wizard
The Wizard asks for several pieces of information. Firstly, it wants a class name. This class name will be used in several places. Type in a value of MyOleServer. This now means the Automation class defined in the application will be TMyOleServer. The interface that will be accessed by Automation controllers will be called IMyOleServer. Finally, given that the project is called Server.Dpr, the ProgID for this Automation object will be Server.MyOleServer.
The next piece of information requested is the instancing option. This is needed to tell Windows what to do if a second Automation client tries to create one of your Automation objects. It is only relevant if you are writing Automation objects within an application (out of process servers).
Multiple Instance means that additional Automation object instances will be created within the same copy of Automation server (a server can maintain multiple instances of the Automation object).
Single instance means that additional Automation objects will come from separate invocations of the Automation server (each server can maintain a single instance of the Automation object).
Lastly, Internal means that the object will not be registered in the system registry and so will not be accessible to Automation clients.
Pressing OK manufactures two units (one of which is not opened in the code editor) and displays the type library editor. A type library is a binary file with a .TLB extension (or sometimes .OLB) that gets linked into your Automation server and allows other development systems to examine the capabilities of your COM objects. The type library editor allows us to build up much of the structure of our Automation object without too much typing.
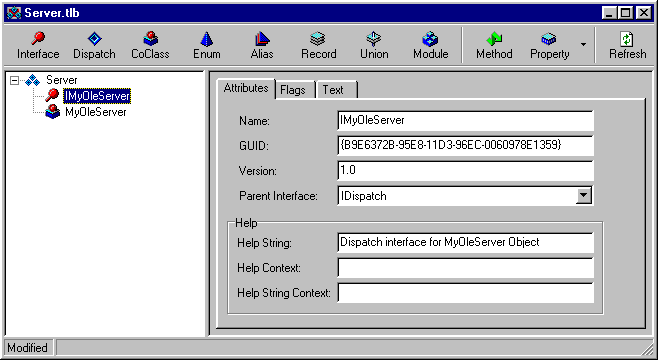
Figure 2: The type library editor showing a new interface
The type library defines interfaces (amongst other things). An interface is a well-defined collection of methods and properties that can be implemented by some object or objects. A type library says which interfaces exist in an application, but gives no information on implementation details.
The Automation Object Wizard manufactured two units along with the type library. The unit which is open in the editor in an unsaved state (Unit1.Pas) defines a class that implements the interface which will be set up in the type library editor. The class is called TMyOleServer and the interface is called IMyOleServer. The syntax that implies this interface implementation looks like this:
TMyOleServer = class(TAutoObject, IMyOleServer)
protected
  { Protected declarations }
end;
This defines a class TMyOleServer, inherited from a class TAutoObject and which implements the IMyOleServer interface. The sample project has this file saved as MyOleServerImpl.Pas.
The other unit that was manufactured has not been opened automatically. If your project is called Server.Dpr, this other unit will be called Server_TLB.Pas. This unit is a Delphi representation of what is in your type library and is referred to as a type library import unit. It gets regenerated when the type library gets updated and so should not be edited directly.
Just as the F12 key can toggle between a form designer and its corresponding form unit, F12 will also toggle between the type library editor and the type library import unit.
This unit contains the definition of the IMyOleServer interface, which looks something like this at the moment:
IMyOleServer = interface(IDispatch)
  ['{F1B8B9A3-9A88-11D1-96E5-444553540000}']
end;
The long numeric-like string above the interface definition (and also visible in the type library editor if IMyOleServer is selected) is a GUID (Globally Unique IDentifier). Specifically, this is an IID (Interface IDentifier) designed to uniquely represent this interface. There is also another GUID, called a Class ID, whose value will be very similar. The Class ID is designed to uniquely represent your ProgID and can be seen by selecting the CoClass, MyOleObject, in the type library editor. Your Automation object's ProgID will be Server.MyOleServer, as described before. All these details will eventually be stored in the registry.
Let's proceed and define a property in our interface that will return the current time, and then implement it in the class. This can be done in a number of ways. To add something to an interface, you can choose Edit | Add To Interface..., or right-click in the Automation class unit and choose Add To Interface..., but we will use the type library editor. If you cannot find the right window, choose View | Type Library.
Select the IMyOleServer interface in the type library editor and press the down arrow next to the Property speedbutton. Choose a Read Only property. This adds a new property to the interface. Set the name of the property to be CurrentDateTime. Now drop down the Type: combobox and choose TDateTime.
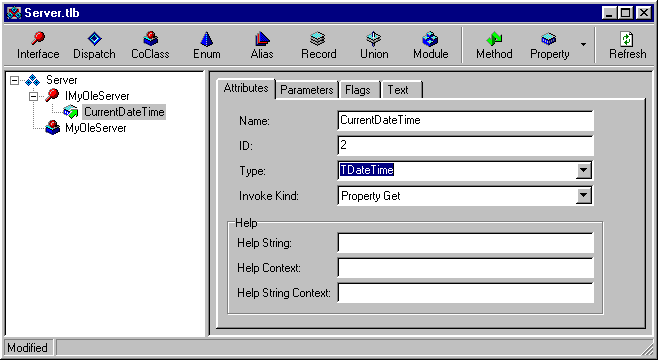
Figure 3: A read-only property has been defined using the type library editor
Depending upon a Delphi environment option, TDateTime may possibly not be in the list. Instead, you will be forced to use type DATE. If this is the case, you should change the option back to the default. Choose Tools | Environment Options... and go to the Type Library page. Now change the Language: setting back to Pascal from IDL.
To update the type library import unit, press the Refresh button. This updates the interface definition (which, remember, has no inherent implementation) to look like this:
IMyOleServer = interface(IDispatch)
  ['{B9E6372B-95E8-11D3-96EC-0060978E1359}']
  function Get_CurrentDateTime: TDateTime; safecall;
  property CurrentDateTime: TDateTime read Get_CurrentDateTime;
end;
and updates the implementing class to look like this:
type
  TMyOleServer = class(TAutoObject, IMyOleServer)
  protected
    function Get_CurrentDateTime: TDateTime; safecall;
    { Protected declarations }
  end;
...
uses
  ComServ;
...
function TMyOleServer.Get_CurrentDateTime: TDateTime;
begin

end;
Since this COM class will be used for automation, the function has been marked with the safecall calling convention modifier. safecall is much the same as stdcall, as far as normal calling convention details go, but safecall does much more. It causes all exceptions to be trapped in the routine in question, and for those exceptions to be turned into standard COM error objects for the client application to make use of.
All that is left for us to do is to implement the function, which simply needs to return the value of the Now function from the SysUtils unit. Modify one of the uses clauses to include SysUtils and change the function implementation to:
function TMyOleServer.Get_CurrentDateTime: TDateTime;
begin
  Result := Now
end;
Before we get onto registering the server, there was that little matter of hiding the main form if we are started under automation control. Make an OnCreate handler for the main form and put this statement in (you will need to add the ComServ unit to the uses clause):
if ComServer.StartMode = smAutomation then
  Application.ShowMainForm := False
In order to get the relevant information stored in the registry we need to run our application. That alone is enough to get the server to store all the appropriate Automation information in the registry, however the application is left running for no real reason. Another possibility is to run the application with a command-line switch of /regserver.
To set up command-line parameters from within Delphi, choose Run | Parameters... When the parameter is set, run the application. You should find it runs and immediately stops. All it did was add enough information into the registry as is needed and then terminated. Now you can remove the parameter, again using Run | Parameters... If at some later point you need to un-register the server, use the parameter /unregserver.
As an alternative, you can register and unregister the server by using the Windows Run dialog (choose Run... from the Windows Start menu). Locate the application using the Browse... button and then add the appropriate command-line parameter to the end of the command line.
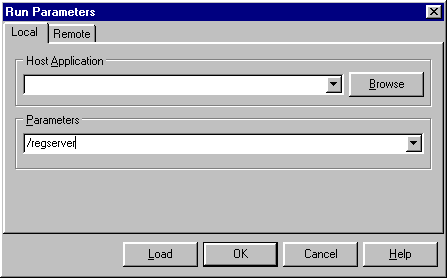
Figure 4: Specifying a command-line switch to register the Automation server
The mechanism used to deal with these command-line parameters is all to do with the Application.Initialize statement in the project source file. This allows the ComServ unit to hook in and execute some code after all the unit initialisation sections and start-up functions have executed, but before the program has properly begun to handle any events. As far as the VCL is concerned, that is the only purpose for the call to Initialize so if you are not writing an Automation server application you may elect to remove the call if you wish.
What happens when a server gets registered? Well, several things are added into the Windows registration database. Run REGEDIT.EXE to see the registry. If you are running Windows NT you will need to be logged on with supervisor rights to see the whole contents.
Expanding the HKEY_CLASSES_ROOT hive shows many keys. Scroll down until you see Server.MyOleServer (our server's ProgID). Click on it and you can see it described as MyOleServer Object. You can expand the ProgID key to reveal a CLSID key. The class ID should match what you see in the type library editor when the CoClass, MyOleServer, is selected in the type library editor. When the appropriate Windows DLLs are told to make a Server.MyOleServer object they will be able to find the class ID. Given this, some cross-referencing is required to get any further.
Scroll back up through HKEY_CLASSES_ROOT until you find the CLSID key and expand it. You will find many GUIDs listed. Scroll down until you see your specific ClassID and then select it. The value is again your server class's description. If you expand the key, you can see a ProgID key whose value will be Server.MyOleServer. Additionally there is a key marked LocalServer32 which gives the command-line necessary to launch this 32-bit local machine hosted Automation server.
To test out this new server object, we can do much the same as we did with Microsoft Word. We will make a new project that will control our Automation server, but we will use a project group to do it. This makes sense as the two projects are very much related right now.
Choose Project | Add New Project... and ask for an Application. You now have two projects available in a currently unsaved project group. You can verify this by looking at the project manager (View | Project Manager). To save all the unsaved files, choose File | Save All. The sample files on the course disk are saved as Client.Dpr, ClientForm.Pas and the project group is ServerAndClient.Bpg.
Note that this client project has been placed in a different directory to the server project. This is just to completely separate all the files from the two projects and ensure that the executables end up in different places. This should (hopefully) prove that the server is being found through the Windows registry, and not by being in the same directory.
To switch the active project in a project group, select it in the project manager and press the Activate button (or simply double-click it). Alternatively use the drop-down list of projects at the top of the project manager.
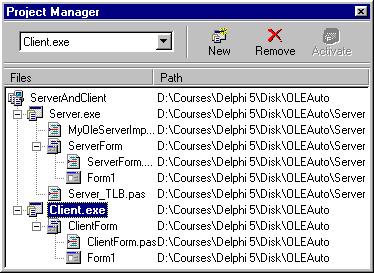
Figure 5: A project group containing an Automation client and server
Now declare a Variant field in the form class (this time call it Server) and add ComObj into your uses clause. Add a timer component, from the System page of the Component Palette, to the form and set its Interval property to 500 (so the OnTimer event triggers every half a second). Make an OnCreate handler for the form and an OnTimer event handler for the timer and set them up like this.
uses
  ComObj;
...
procedure TForm1.FormCreate(Sender: TObject);
begin
  Server := CreateOLEObject('Server.MyOleServer');
  //Execute the OnTimer handler straight
  //away to avoid initial 1/2 sec delay
  if Assigned(Timer1.OnTimer) then
    Timer1.OnTimer(Timer1);
end;

procedure TForm1.Timer1Timer(Sender: TObject);
begin
  try
    Caption := Server.CurrentDateTime;
  except
    // if there was an Automation problem
    on EOleError do
      Caption := 'Cannot talk to Automation server right now';
  end;
  // Make the application icon match the form caption
  Application.Title := Caption;
end;
The CurrentDateTime property is defined to be of type TDateTime, but is being read via a Variant variable. This means we can simply assign it to a string variable or property, and the values will be translated as appropriate.
The exception handling block helps cater for such problem as the server not being registered, or the property not being available. This test harness program is in the accompanying ZIP as Client.Dpr.
Because the Automation object application conforms to Automation requirements it can be made use of by any other language that supports writing Automation controllers, such as Borland C++Builder or Microsoft Visual Basic. For example, a VB test application can be written in exactly the same way. The following steps should suffice:
OnLoad event handler and type:Set Server = CreateObject("Server.MyOleServer")Active property to True
OnTimer event handler and type:Form1.Caption = Server.CurrentTime
Having seen (twice now) how to control an automation server with a
Variant, we will now rebuild our client application and instead use the specific interfaces defined in the type library. These are defined in the type library import unit.
Make a new application for our second client. To keep the new project in the project group, you can choose
Project | Add New Project..., or press the New button on the Project Manager's toolbar. Save the project files somewhere. The files on the course disk are in the accompanying ZIP as Client2.Dpr.
Again, this client project is in a separate directory to the server for the reasons mentioned above. Add a timer as with the previous client, and Server_TLB into the
uses clause (in the interface section of the unit). This should allow us to access the interfaces defined in the type library, but not get at any other implementation details. However, the server's type library import unit is in a different directory. To remedy this problem, you can modify the compiler search path in the project options dialog. Go to the Directories/Conditionals page and add the Server directory to the Search path: field.
Alternatively, you could add the type library import unit to the client project. But here again, there is a slight problem. Due to an issue with the Delphi Project Manager, if a file is part of one project in a project group, it cannot be added to any other projects in the same project group. The type library import unit is already part of the server project. Whilst no error is produced when you try to add the file to another project, the desired effect does not happen. To overcome this, close all files (
File | Close All), open up the new client project, Client2.Dpr. Now use Shift+F11 to add the Server_TLB.Pas file from the Server directory to the project. If you wish, you can now re-open the project group using the File | Reopen menu.
To represent the Automation server, we need to declare a data field in the
public section of the form class. Rather than a Variant, this time we use a dedicated type, which will be the interface we ultimately wish to access (IMyOleServer).
TForm2 = class(TForm)
  Timer1: TTimer;
  procedure FormCreate(Sender: TObject);
  procedure Timer1Timer(Sender: TObject);
private
  { Private declarations }
public
  Server: IMyOleServer;
end;
In the form's
OnCreate event handler, the Automation (or COM) object is accessed using the Create method of a proxy class also present in the type library import unit. This proxy class will be called CoMyOleServer.
procedure TForm2.FormCreate(Sender: TObject);
begin
  Server := CoMyOleServer.Create;
  //Execute the OnTimer handler straight
  //away to avoid initial 1/2 sec delay
  if Assigned(Timer1.OnTimer) then
    Timer1.OnTimer(Timer1);
end;
Now you can call the methods of your interface directly, or indeed access the properties. Additionally, you get to take advantage of the Code Completion and Code Parameters facilities in the editor, just like when talking to native Delphi objects. Finally, you will be told of any reference to invalid properties during the compilation, instead of at run-time, when using interfaces.
The timer's
OnTimer event handler might now look like this:
procedure TForm2.Timer1Timer(Sender: TObject);
begin
  try
    Caption := DateTimeToStr(Server.CurrentDateTime)
  except
    // if there was an Automation problem
    on EOleError do
      Caption := 'Cannot talk to Automation server right now';
  end;
  // Make the application icon match the form caption
  Application.Title := Caption;
end;
For the reference to the
EOleError exception class to compile successfully, you will need to add the ComObj unit to the uses clause.
DateTimeToStr
TDateTime, Delphi will be type-strict with it now, and so we must explicitly do the translation.In the previous section, we made use of a type library import unit that already existed, thanks to the server project being written in Delphi. In the general case, Automation servers come with type libraries, which are registered in the Windows registry. In order to use them, we can import the type library, which will cause Delphi to generate a type library import unit.
Type library import units have various things added to them, in addition to what is in the type library. One is the proxy class we used above. But there is also a component wrapper class for any Automation objects defined in the type library. All you need to do is install the type library import unit and the component wrapper will appear on the Component Palette.
Let's pretend that the Automation Server we are trying to talk to is one for which we do not have a type library import unit. Instead, we will assume that the server has been installed correctly, and the type library is registered. This being the case, we can import the type library. Choose
Project | Import Type Library... and you will see a dialog listing all the registered type libraries.
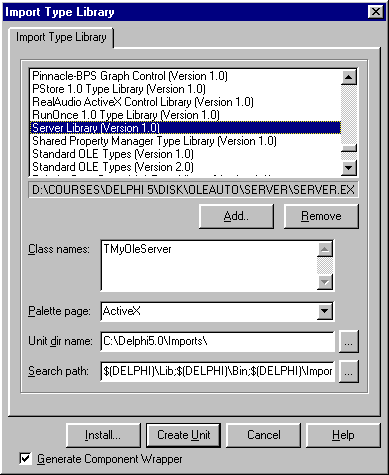
Figure 6: Importing a registered type library
You can see that when you select the appropriate type library, the dialog shows which components are to be manufactured (assuming the checkbox at the bottom of the dialog remains checked), which Component Palette page they will appear on, and where the type library import unit will be placed. Delphi's Imports directory is the default.
You can either press Create Unit to create the import unit, and not register it or, preferably, the Install... button. This will produce another dialog that asks you which component package you wish to add the import unit to (the default suggestion is fine).
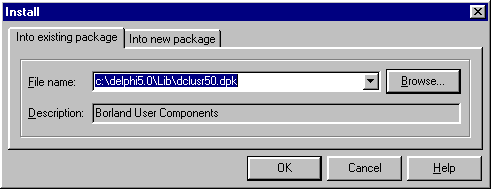
Figure 7: Installing a component that represents an Automation server
Press OK and accept Delphi's offer to recompile the package and you will be told that the component has been installed.
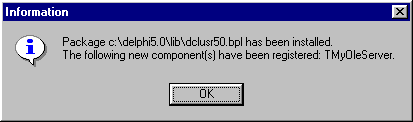
Figure 8: Delphi reports successful installation of the component wrapper
Now we can make a third version of the client project. Add a new project to the project group and set it up with a timer as before. This project will be called Client3.Dpr (its form unit is called Client3Form.Pas). Go to the ActiveX page of the Component Palette and get a TMyOleServer component and drop it on the form.
The component will be called MyOleServer1 by default. Change this to Server (for consistency with the other client projects). Change the AutoConnect property to True so we need not worry about establishing a connection to the Automation Server. The code for the timer's OnTimer event handler is exactly as it was before, so add the code in and run the application. The component wrapper makes the connection to an Automation server less tedious than it was previously.
Commercial Automation server applications, such as the Microsoft Office applications typically come with a type library. You can usually import their type libraries just as easily as you can your own type library, using the same import dialog.
In most cases, type libraries get logged in the Windows registry and so the environment can find them easily, but occasionally you have to go hunting. A prime example is Microsoft Word 97. The list of type libraries in the type library import dialog does not include Word 97, as the type library is not registered. Consequently, you would need to press the
Add... button and go looking for it. You will probably find the file stored as C:\Program Files\Microsoft Office\Office\MSWord8.Olb. Because Word offers so many interfaces for Automation, this will generate a very large unit when imported.
As luck would have it, you may not have to do any importing for Microsoft Office applications. Delphi ships with type library import units for all the Microsoft Office 97 applications. Also, the component wrappers present in these import units have been pre-installed on the Component Palette's Servers page. Thanks to this, you can automate Office 97 through its COM interfaces by dropping appropriate components onto your forms.
Delphi 5 Update Pack 1 fixes various problems in Delphi 5 as well as supplying an alternative component package dedicated to Microsoft Office 2000. To switch between the component sets, choose
Component | Install Packages... and browse through the Design packages list. You should fine an entry in the list described as Borland Sample Automation Server Components. When you select it, the label below the list will specify that the package is either DCLAXServer50.Bpl (for Office 97) or DCLOffice2K50.Bpl (for Office 2000).
You must unload the package that is installed by pressing
Remove, and accepting any confirmations that come up. Then you need to add the other package in by pressing Add... and browsing to Delphi's BIN directory. You will see both of the package files and you can choose the one you need.To see how we automate a less academic example of an Automation server using the pre-supplied component wrapper, let's go back to Microsoft Word once again.
Make a new project with the same buttons and memo on the form as we had in the previous Word Automation projects and then add a
TWordApplication component to the form from the Servers page of the Component Palette. Change its name to MSWord. Set the AutoQuit property to True (the latter property ensures that Word will be forcibly terminated upon exit of our application if it is still running). Save the project. A ready-made project is supplied on the course disk as WordEg2.Dpr.
In the event handler for the
Start Word button, add this code.procedure TForm1.btnStartWordClick(Sender: TObject); begin MSWord.Connect; MSWord.Visible := True end;
Here is the new code for the other three button
OnClick event handlers.
procedure TForm1.btnStopWordClick(Sender: TObject);
var
  SaveChanges: OleVariant;
begin
  SaveChanges := False;
  MSWord.Quit(SaveChanges);
  MSWord.Disconnect
end;

procedure TForm1.btnNewDocClick(Sender: TObject);
begin
  MSWord.Documents.Add(EmptyParam, EmptyParam)
end;

procedure TForm1.btnInsertTextClick(Sender: TObject);
var
  DateTimeFormat, InsertAsField: OleVariant;
  Sel: Selection;
begin
  Sel := MSWord.Selection;
  Sel.TypeText(memTextForWord.Text);
  DateTimeFormat := 'dddd, dd MMMM yyyy';
  InsertAsField := False;
  Sel.InsertDateTime(
    DateTimeFormat, InsertAsField, EmptyParam);
  Sel.TypeParagraph
end;
The event handlers for the other buttons look much as expected (particularly if you have browsed through the type library import unit), but there are some noteworthy points about them.
The temporary variable used in the last button handler above is used to store an interface reference. The
Selection property of Word's Automation object is defined to return an interface reference of type Selection.
When passing parameters to Automation servers using COM interfaces through a component wrapper, optional parameters are still supported thanks to the component wrapper defining overloaded versions of the routines. The call to
Quit, for example, still has just one parameter, omitting the two optional parameters. However, optional parameters are typically var parameters of type OleVariant. This means to pass a value, you must declare a variable of type OleVariant, assign it the desired values and pass it to the method in question. This is done in the call to InsertDateTime in the Insert text button event handler.
If the component wrapper interface gives you a reference to another interface, there will be no support for optional parameters there. You can see the issue in the
Insert text button event handler. The optional parameters for InsertDateTime must be specified. But, as you can see, if you are not interested in specifying a value other than the default, you can use the system-defined EmptyParam variable. This is an OleVariant that has been set up to act as a placeholder for an optional parameter.
Click here to download the files associated with this paper.
Brian Long used to work at Borland UK, performing a number of duties including Technical Support on all the programming tools. Since leaving in 1995, Brian has spent the intervening years as a trainer, trouble-shooter and mentor focusing on the use of the C#, Delphi and C++ languages, and of the Win32 and .NET platforms. In his spare time Brian actively researches and employs strategies for the convenient identification, isolation and removal of malware.
If you need training in these areas or need solutions to problems you have with them, please get in touch or visit Brian's Web site.
Brian authored a Borland Pascal problem-solving book in 1994 and occasionally acts as a Technical Editor for Wiley (previously Sybex); he was the Technical Editor for
Mastering Delphi 7
and
Mastering Delphi 2005
and also contributed a chapter to Delphi for .NET Developer Guide
.
Brian is a regular columnist in The
Delphi Magazine and has had numerous articles published in Developer's Review,
Computing, Delphi Developer's Journal
and EXE Magazine. He was nominated for the Spirit
of Delphi 2000 award.