
Brian Long Consultancy & Training Services
Ltd.
March 2011
Accompanying source files available through this
download link
You’ll doubtless be aware that many iPhone applications respond to you rotating
the phone 90 degrees by reorganizing their UI to display appropriately in a landscape
manner instead of portrait. The main underpinning to this support is the ShouldAutorotateToInterfaceOrientation()
virtual method of the view controller class. When the phone is rotated this method
is called with the new orientation (Portrait, LandscapeLeft,
PortraitUpsideDown or LandscapeRight) and the method returns
true or false depending on whether the app should be rotated
to that orientation. Returning true regardless means the app will rotate
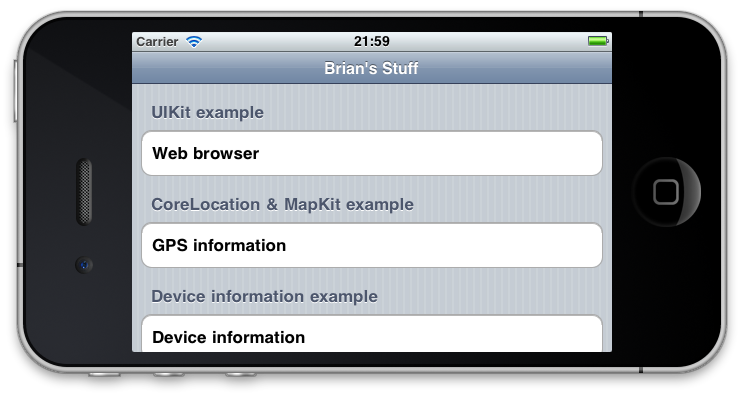
around as the phone is rotated, but won’t reorganize per se. In the case of a simple
form like this app’s main form, just containing a Table View, that would be enough
as the Table View will fill up the available space:

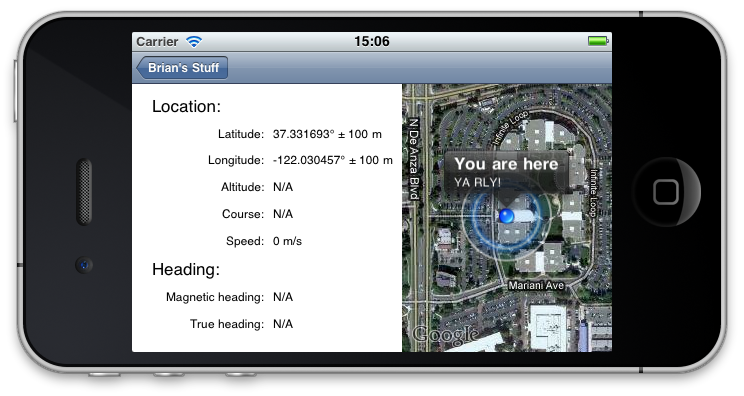
However, something like GPS Page will require more attention given the variety of controls. If we leave things as they are the Map View will not be visible and there would be blank space on the right.
We still need ShouldAutorotateToInterfaceOrientation to return true
but we also need to implement WillAnimateRotation to act on the rotation
and re-jig the control layout. A helper routine, SetupUIForOrientation,
will be used that takes the new UI orientation.
SetupUIForOrientation(toInterfaceOrientation);
Additionally we will need to call the helper routine from ViewDidAppear
given the phone could be in any orientation when the GPS Page is invoked.
At the start of ViewDidAppear add:
if ((InterfaceOrientation == UIInterfaceOrientation.LandscapeLeft) || (InterfaceOrientation == UIInterfaceOrientation.LandscapeRight))
SetupUIForOrientation(InterfaceOrientation);
This helper routine will look at the orientation and locate the Map View accordingly, either below the labels in portrait modes or to the right of them in landscape modes.
using System.Drawing;
...
private void SetupUIForOrientation(UIInterfaceOrientation orientation)
{
//iPhone is 320x480
//iPad is 768x1024
var DeviceHeight = (int)UIScreen.MainScreen.Bounds.Height;
var DeviceWidth = (int)UIScreen.MainScreen.Bounds.Width;
const int NavBarHghtPortrait = 44;
const int NavBarHghtLandscape = 32;
const int TextLabelsWidth = 270;
const int TextLabelsHeight = 257;
var AppFrame = UIScreen.MainScreen.ApplicationFrame;
if ((orientation == UIInterfaceOrientation.Portrait) || (orientation == UIInterfaceOrientation.PortraitUpsideDown))
MapView.Frame = RectangleF.FromLTRB(0, TextLabelsHeight,
DeviceWidth, AppFrame.Height - NavBarHghtPortrait);
else
MapView.Frame = RectangleF.FromLTRB(TextLabelsWidth, 0,
DeviceHeight, AppFrame.Width - NavBarHghtLandscape);
}
The constants have been worked out manually. The full screen resolution (in points)
is given by UIScreen.MainScreen.Bounds (320 wide by 480 high in iPhones)
and the available space on screen, taking into account the status bar, is given
by UIScreen.MainScreen.ApplicationFrame. The dimensions of the Map
View are calculated using these various dimensions.

For example, in landscape mode (shown above) the Map View needs its left border placed after the full width of the text labels area and its top at the topmost pixel, 0, which will be immediately below the status bar and Navigation bar. Its right needs to be the rightmost pixel on the screen, given by the screen ‘height’, and the bottom border will be at the bottom of the landscape screen, which is the application frame width (screen ‘width’ minus status bar height) minus the height of the Navigation Bar.
Go back to the top of this page
Go back to start of this article