
This final instalment looks at console applications.
This article first appeared in Linux Format Issue 32, November 2002.
Click here to download the files associated with this article.
If you find this article useful then please consider making a donation. It will be appreciated however big or small it might be and will encourage Brian to continue researching and writing about interesting subjects in the future.
Sadly this is the last part of this series on Kylix Open Edition; we hope you've found the subjects useful. This month we are finishing by looking at applications that don't have a GUI, ones that can be run from any shell prompt, including those outside X.
Command line applications are often written in C, C++ and Perl but Kylix is perfectly capable of joining the ranks of tools that can be used to build command line utilities.
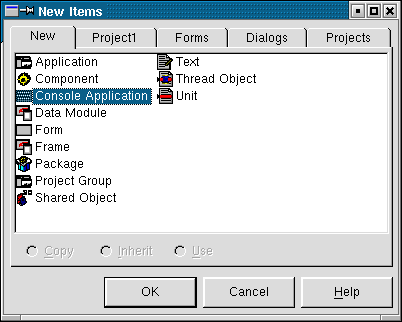
The first step to getting a command line application in Kylix is to choose File | New... to invoke the Object Repository dialog (see Figure 1). Select the Console Application icon and press OK. This gives you a small project file, with no accompanying units and no classes defined in it.
Figure 1: The File | New... dialog
|
Of course as you develop your console applications it will be appropriate to add units to modularise it, but the fresh project doesn't have any.
This is the bare bones console app with just a project file and no units at all. If you run it from the IDE and Kylix was launched from a console window (rather than a desktop menu) then the application's output will appear in that console. If not, the output will go off into the ether.
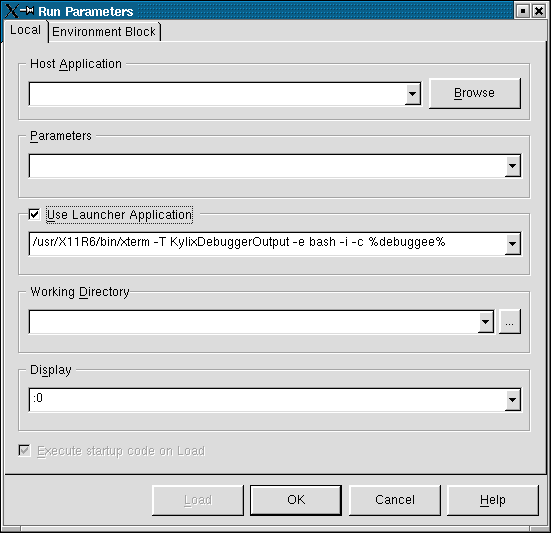
If you didn't launch Kylix from a console then you can either run your programs manually from a console prompt or alternatively try an IDE option intended to resolve the issue. The Run | Parameters... dialog has an option that runs your console program via a launcher - in short it launches a copy of xterm and runs your program from there (see Figure 2). To be fair we have had difficulties getting this option to have the intended effect in any version of Kylix (1, 2 or 3) but that may be our installation setup. We recommend starting Kylix from a console window.
Figure 2: Ensuring console apps work from the IDE
Alternatively you can run it from a command prompt. GUI applications require you to run the kylixpath script from the Kylix bin directory (as explained in the online article http://bdn.borland.com/article/0,1410,28057,00.html) to ensure you get access to the Qt library, required for VisualCLX controls. However console applications have no dependency on CLX so this is not necessary.
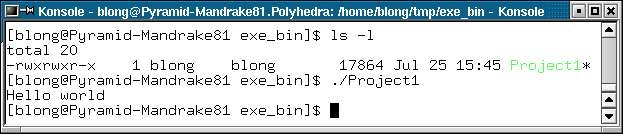
The following slightly modified project includes one output statement and you can see what it produces in Figure 3.
|
Figure 3: A trivial (and small) command line application

Notice that Kylix Open Edition applications always try to advertise their development tool by default (a kind of console nag screen). GUI applications display a temporary non-modal window (a proper nag screen) on startup with a little message, which can be disabled by passing the -ns command line switch. Console applications display a little Kylix advert as their first line of output unless you remove the $APPTYPE compiler directive from the project file.
The directive actually does nothing useful anyway so it is safe to remove (just delete the whole line). It has more of a point in Delphi on the Windows platform where the compiler has to do special things to make a working console application. With it gone we get only what we specifically write out, as shown in Figure 8.
Figure 4: A console app without a nag line
Linux (and C/C++) uses three standard file handles for dealing with the keyboard (stdin) and screen (stdout and stderr). Kylix surfaces these through three text file variables Input, Output and ErrOutput. You can read from Input to read keyboard input and you can write to Output or ErrOutput to display text on the screen as we shall see.
These variables support shell file redirection, so the user could run your application with the stdin file redirected to a file on disk. Similarly the output could be redirected to another disk file, as can the error output.
Now on to the more interesting stuff, actually doing the reading and writing to the standard file variables... The Pascal routines we need to be familiar with are Read, ReadLn, Write and WriteLn. These are just a few of the available file manipulation routines in the Object Pascal language (though you should note that as of Kylix 3 and Delphi 7 the Object Pascal language has been renamed the Delphi language - Kylix 3 allows development in either the Delphi or C++ languages).
These routines all operate on a file variable. If the file variable is specified, then things are straightforward, but if no file variable is specified then Read and ReadLn assume they should read from Input, whereas Write and WriteLn default to writing to Output. The code listing above used WriteLn with no file variable. It wrote the specified text to stdout and followed it by a new line (that's what the Ln part implies). To show the idea, here are a number of equivalent statements written in various ways.
|
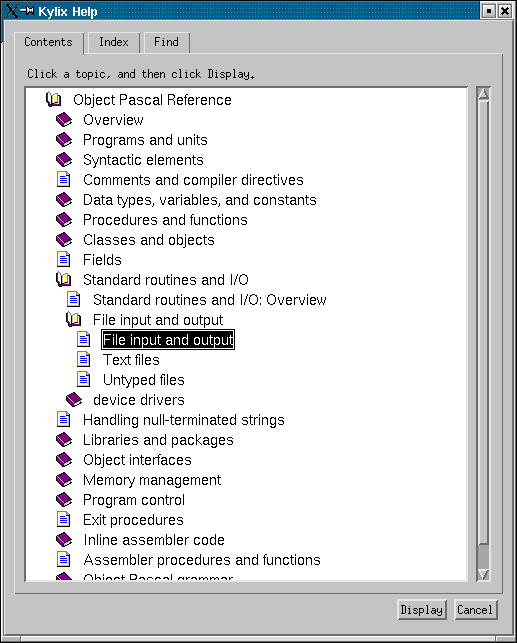
Each line achieves the same thing. Note that Write and WriteLn are special routines in Kylix as you can pass as many values to them as you wish (of varying types, such as strings, characters, integers, floating point numbers or Booleans). Each value is written in the order passed and a line feed is automatically output if WriteLn has been called. You can read more about these routines in the online help. You can also find more about file processing in general in the Object Pascal Reference Guide (choose it from the Help menu). A suitable help topic is highlighted in Figure 5.
Figure 5: Where to learn about the file handling system in the Delphi language
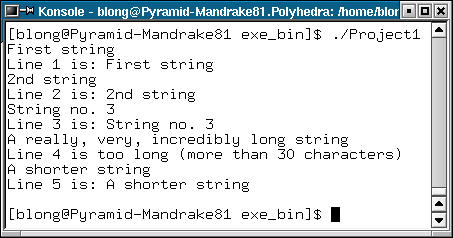
This code represents a simple program that reads from stdin and writes to stdout (and sometimes to stderr). It keeps track of how many lines have been read and simply prefixes them with a little description before outputting them. If the string happens to be longer than some arbitrary limit (30 characters) a message is sent to stderr instead of stdout.
|
If the program is run from a prompt you can type in lines and they will be spat back out at you, modified as per the source. Figure 6 shows a sample session. You can see that most lines were accepted and prefixed appropriately, except the longer fourth line. The program was terminated by pressing Ctrl+C.
Figure 6: Reading from and writing to the console
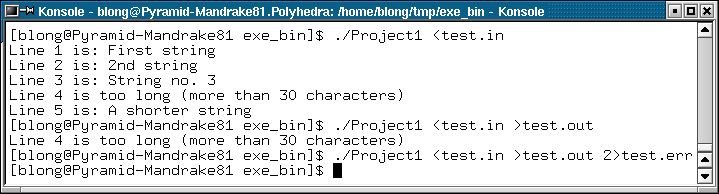
As you might expect, console redirection is supported so you can feed input to the program from a file, redirect output to a file and even redirect error output to a different file. Assuming the existence of a text file test.in this command would take input from that file and would create the file test.out to store the results:
|
Anything written to ErrOutput would still appear on the screen as before. This version of the command would redirect both stdout and stderr to the same output file, test.out:
|
Finally, this command would redirect stdin to read from test.in, stdout to test.out and stderr to test.err:
|
You can see these commands being executed in Figure 7.
Figure 7: Console I/O supports redirection
For a console application to be flexible it must support command line parameters (after all, there is no menu available to choose from). There are several ways to access the command line used to invoke your program and identify the various passed arguments.
The recommended approach is to either use the ParamCount and ParamStr functions, which give you access to each individual argument as a string, or to use FindCmdLineSwitch, which lets you search for a specific parameter you are expecting.
Let's take the latter option first. You'd use FindCmdLineSwitch if you are expecting specific individual command line options rather than lots of command switches that can be merged together in various permutations. So if you want to respond to -help and -version options in a case-sensitive fashion you could write code like this:
|
However there are two additional overloaded versions of this routine. The first one assumes case sensitivity and so takes just the first two parameters. The second one assumes case sensitivity and the use of - as the command line switch prefix character. So you could abbreviate this to:
|
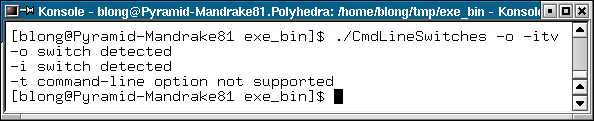
Of course it is quite typical for Linux applications to take various single letter command line switches and in most cases these can be combined into "compound" command line options. For example, if the program supports -i, -v and -o command line options then -iv or -oi or -ivo would also be perfectly acceptable. Due to the number of possible combinations, FindCmdLineSwitch is not so suitable here so we should look at the other options.
The code below represents a simple project that checks all its command line parameters for validity. ParamCount tells you how many parameters have been passed and ParamStr(n) returns the nth parameter. The code loops across each parameter and checks that it starts with the appropriate - character and that there are additional characters after it before proceeding to look at each character individually (a nested loop). Recognised command line characters are reflected by messages sent to stdout, but a bad character causes a message to go to stderr and the code bails out.
|
Of course, this is simple code and you would need to extend it to set appropriate flags for the options found (instead of writing out messages) and in many cases these command-line switches are followed by values. Depending on your needs you will need to butcher this basic framework to a greater or lesser extent.
You can see an invocation of this program in Figure 8.
Figure 8: Detecting command-line switches
Last month we built a GUI process viewer. This month's project uses most of the code from that application to build a command line utility that can list processes (in varying ways) and kill a specified process.
The project is called pslst.dpr and can be found on this month's disk along with last month's GUI version, pslist.dpr. Since most of the code is the same the only interesting part to show is the command-line parameter analysis.
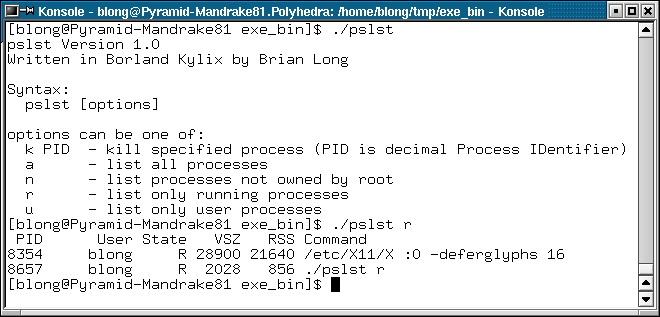
In this case the application takes one of five possible command-line options and this simple application expects only one of them to be passed. If this is done the program will either kill the process identified by the PID (the k command-line option), list details of all processes (a), the current user's processes (u), running processes (r) or processes owned by users other than root (n). If not, you get a help screen explaining the syntax.
|
You can see a couple of invocations of the program in Figure 9, one to get the help screen and one to list running processes. As you can see the utility lists out the process PID, the owning user, its state, its virtual memory size, resident memory size and the command line that invoked it.
Figure 9: The command-line process list application
Note that when implementing classes, or entering any other common code snippets, you can save on the typing by using Kylix Code Templates. We looked at Code Completion (Ctrl+Space) and Code Parameters (Ctrl+Shift+Space) some while ago, but Code Templates is another editor feature.
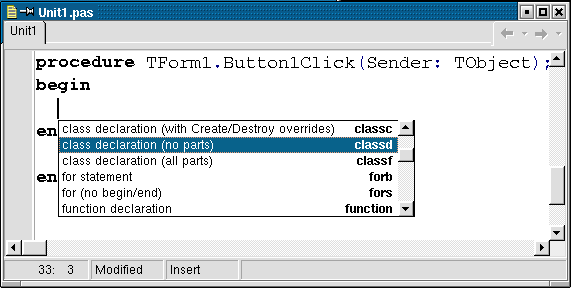
There are a number of predefined Code Templates that can be entered by pressing Ctrl+J and selecting from the list (see Figure 10). The text of the Code Template will then be entered into the editor with the cursor left in the most likely place you will need to type something.
Figure 10: Selecting a Code Template from the list
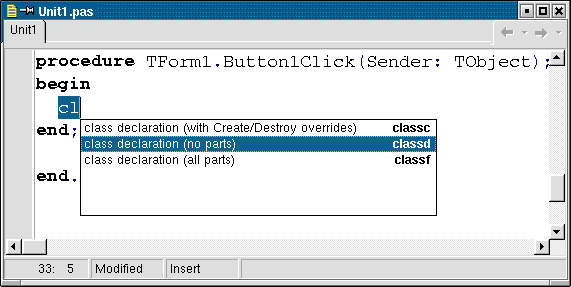
You can get a shorter list by typing the first letter(s) of the Code Template you need. For class declarations you could enter "cl" and then press Ctrl+J to see only the pertinent ones listed (see Figure 11).
Figure 11: Selecting a Code Template from a smaller list
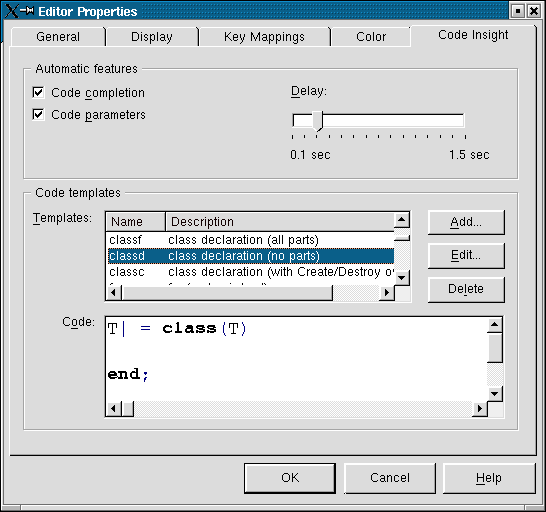
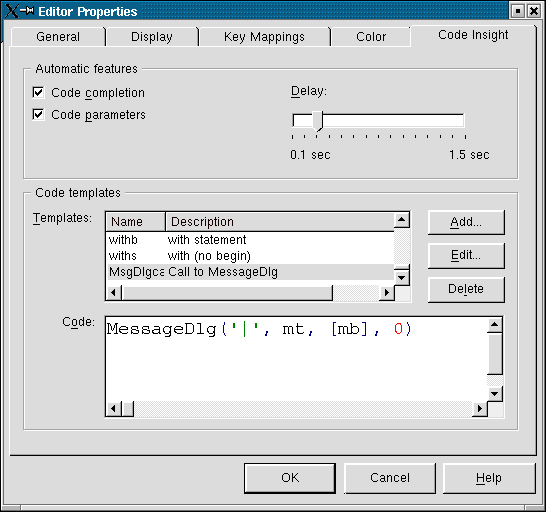
You can set up your own Code Templates on the Code Insight page of the editor options dialog (Tools | Editor Options...), which looks like Figure 12. Any commonly entered text, such as calls to MessageDlg, ShowMessage or Format, or even a simple begin/end statement would be useful to make new Code Templates for.
Figure 12: Customising the editor productivity options
Press the Add button in the Code templates group box and enter a name and description of your new Code Template (see Figure 13). Then you can enter the code snippet you want to be represented by the Code Template. An example is shown in Figure 14. Notice the use of the pipe sign to specify where the cursor should be left (in this case between the quotes of the string parameter).
Figure 13: Adding a new Code Template
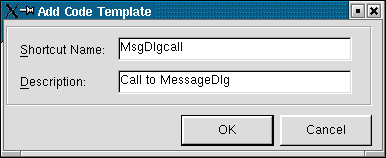
Figure 14: A simple Code Template for a call to MessageDlg
We have seen that Kylix is just as suited to building command-line utilities as it is for building full-scale graphical X applications.
Please keep an eye out for Kylix 3, which is out now. For anyone who is a dab hand with C++, Kylix 3 should be a most pleasant experience. It includes not only with the next version of the Delphi language version but also a completely compatible C++ version. You can use your knowledge of the CLX library in C++ applications if you require and can also mix Pascal and C++ source files in the same project.
Anyway, that concludes this tutorial series, we hope you enjoyed it. Good luck with your Kylix programming.
Brian Long used to work at Borland UK, performing a number of duties including Technical Support on all the programming tools. Since leaving in 1995, Brian has spent the intervening years as a trainer, trouble-shooter and mentor focusing on the use of the C#, Delphi and C++ languages, and of the Win32 and .NET platforms. In his spare time Brian actively researches and employs strategies for the convenient identification, isolation and removal of malware.
If you need training in these areas or need solutions to problems you have with them, please get in touch or visit Brian's Web site.
Brian authored a Borland Pascal problem-solving book in 1994 and occasionally acts as a Technical Editor for Wiley (previously Sybex); he was the Technical Editor for
Mastering Delphi 7
and
Mastering Delphi 2005
and also contributed a chapter to Delphi for .NET Developer Guide
.
Brian is a regular columnist in The
Delphi Magazine and has had numerous articles published in Developer's Review,
Computing, Delphi Developer's Journal
and EXE Magazine. He was nominated for the Spirit
of Delphi 2000 award.