

This month Brian Long shows how the new product info browser for Linux Format cover disks was written
This article first appeared in Linux Format Issue 25, March 2002.
Click here to download the files associated with this article.
If you find this article useful then please consider making a donation. It will be appreciated however big or small it might be and will encourage Brian to continue researching and writing about interesting subjects in the future.
A little while our esteemed editor let it be known that Linux Format needed a browser application to supply on each month's cover disk (either CD or DVD format), to allow readers to see what was on the disks and where. The suggestion was that it might be nice to write in Kylix if it was up to the job, otherwise it was to be written in C++ with the GTK or Qt libraries.
Given the challenge we felt obliged to ensure Kylix Open Edition got the job done and this month's instalment looks at how the finished application (shown in Figure 1) was built.
Figure 1: The CSV reader application
The data files that are to be read by the app are stored in CSV (Comma-Separated Values) format. However, every field has quotes around it meaning they can also be read as SDF (System Data Format) files. This is convenient as the Kylix TStringList class makes it very easy to deal with SDF data.
Each line describes an item on the CD (a tool, library, game, etc.), for example:
"LXFCD23","Kylix","Magazine/Kylix","Kylix Open Edition again, for you to use with our tutorial series. This directory also contains example files from the tutorial.",""
The first field identifies the magazine issue and the cover disk format (the CD version of Issue 23 in this case), the second is the name of the item. The third field is the location on the CD, the fourth gives a description and the fifth is a URL that provides more information or the most up-to-date version.
The plan is to support passing a file name as a command-line parameter. If no appropriate file name is passed the application will look for files with a .csv extension in the current directory. Additionally the user can switch from one CSV file to a different one at any time using a menu item.
The following describes the process to recreate the browser project. In a fresh Kylix project, name the form frmMain, give it a descriptive caption and set its Position property to poScreenCenter, then add an image list component (from the Common Controls page of the Component Palette) and a main menu component, connecting the two via the menu's Images property.
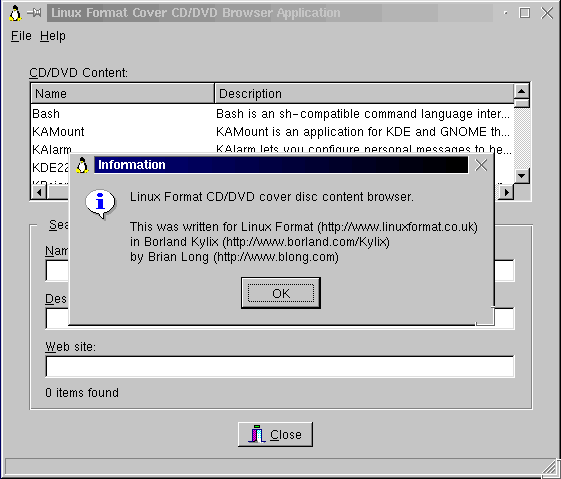
Set up a menu using the Menu Designer that includes File | Open..., File | Exit and Help | About items called mniOpen, mniExit and mniAbout respectively. Then add some appropriate images to the image list to represent these menu items and associate them with the menu items' ImageIndex properties. The event handlers of the latter two menu items are very straightforward (you can see the About box in Figure 2) and we will come back to the File | Open... menu later:
|
Figure 2: The CSV reader About box
Next, add a TBitBtn (called btnExit) from the Component Palette's Additional page and set its Kind property to bkClose (this gives it an appropriate picture and makes it automatically close the form).
To allow the CSV file content to be displayed in some easy-to-read way, add a list view component (from the Common Controls page) and name it lvCDContent. Set its MultiSelect and RowSelect properties to True (so we can see several selected rows simultaneously) and use the Columns property editor to define the required columns (see Figure 3).
Figure 3: Setting up the list view columns
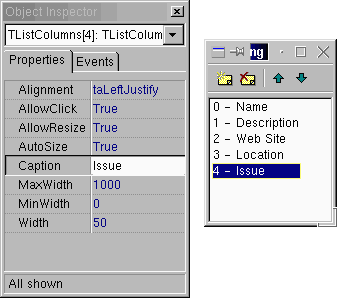
The column order in the program is: Name, Description, Web Site, Location and Issue (note that this differs from the order in the CSV file). To ensure a nice display set the AutoSize property of the Name, Web Site and Location columns to True (but not that of the lengthy Description column) and the MaxWidth property of Description to $8000.
Next set the ViewStyle property to vsReport so we can see all the columns and ShowColumnSortIndicators to True to allow the user to order the list view content by clicking on the various column headers.
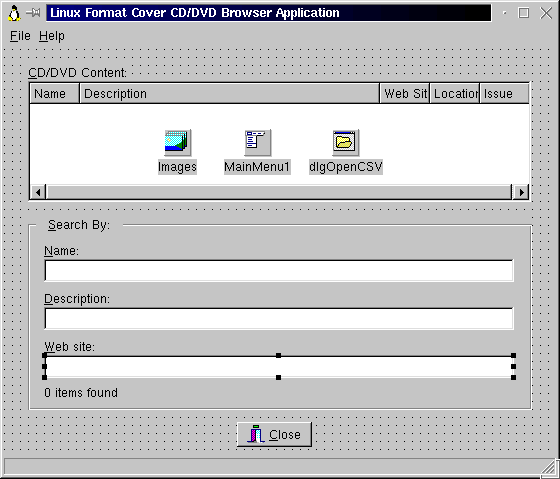
To facilitate searching on the more interesting columns add a group box component and place three edit controls inside it, called edtName, edtDescription and edtURL. These will allow the user to enter specific criteria to locate items in the list view.
Adding some text into any, some or all of the edits will reduce the list view to showing only the items that have text matching in the corresponding fields. Since they all do the same thing (specify criteria for different columns) they will ultimately share an OnChange event handler to allow one set of code to do the job. Another component to add in the group box is a label (called lblResults) with a caption of: 0 items found. This will be updated in the edits' shared OnChange handler to reflect how many items met the search criteria.
As an aesthetic touch, and as a help to users of the application, you can drop label components above the edits and list view describing their function. You can also link these labels to their corresponding controls by using an ampersand (&) in their caption and setting their FocusControl properties. For example, a label with a caption of C&D/DVD Content: draws an underscore under the first letter D in its caption. If the user presses Alt+D the label will set focus to whichever control is connected to its FocusControl property (the list view for that label).
The final component is a status bar (from the Common Controls page) with its AutoHint and SimplePanel properties set to True, so it automatically shows long hints. Now all that is required to finish the UI is to set up hints for all the controls (you can specify short hints and long hints separated by a pipe sign in their Hint property) and set the form's ShowHint property to True (so all the controls can display their short hints in tooltips). You can see the finished form in the Form Designer in Figure 4.
Figure 4: The finished browser UI in Kylix
To add some polish you can also use the Anchors property of the list view, the group box and the edits to make them demonstrate some geometry management and maybe set the form's Constraints property to limit how small the form can go. The pertinent properties in our application are shown in the following list:
frmMain

Width = 552
Height = 451
Constraints.MinHeight = 415
Constraints.MinWidth = 225

lvCDContent

Anchors = [akLeft, akTop, akRight, akBottom]
Hint = CD/DVD contents|This lists everything on this month''s cover CD/DVD'

GroupBox1

Caption = &Search By:
Anchors = [akLeft, akRight, akBottom]

edtName

Hint = Name search|Enter some characters from the Name field to locate it in the list
Anchors = [akLeft, akTop, akRight]

edtDescription

Hint = Description search|Enter some characters from the Description field to locate it in the list
Anchors = [akLeft, akTop, akRight]

edtURL

Hint = Web site search|Enter some characters from the Web Site field to locate it in the list
Anchors = [akLeft, akTop, akRight]

btnExit

Hint = 'Exit application|Close this cover CD/DVD search application'
Anchors = [akBottom]
Kind = bkClose
If you haven't played with anchors before you should really do so - they make it a breeze to have controls stretch and contract and/or move as the user resizes the form (see Figure 5).
Figure 5: What the app looks like after resizing, thanks to the handy Anchors property

Normally, a control's Anchors default to [akLeft, akTop] meaning that when the form is resized a fixed distance is maintained between the control's left side and the form's left side and also between the top of the control and the form. Naturally, the gap between the right edges and the bottom edges changes as you resize the form. You can choose other anchor settings to ensure that controls move or resize to keep a fixed or even distance relative to other edges.
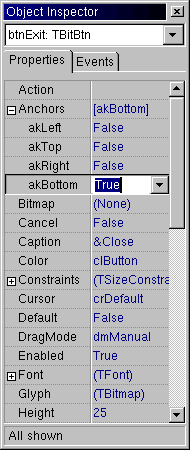
In the case of the exit button (which is centred near the bottom of the form), the single anchor value of [akBottom] (see Figure 6) makes the button stay just above the bottom of the form and remain equidistant from the left and right edges (as can be seen in Figure 5).
Figure 6: Setting anchors for the Close button
Having got the application UI out of the way we can now concentrate on how the application is going to work. When the program starts up we need to populate the list view with appropriate items gleaned from the CSV file. In this case we will have two separate methods to do this job; a high level one called ReadFileIntoListView and a lower level one called ReadLineIntoListView. The former routine takes the name of the file to read as its only parameter.
The form's OnCreate event handler will call ReadFileIntoListView (and needs to do nothing else). ReadFileIntoListView will open the CSV file (whose name is identified by another helper method called GetCSVFileName) and for each line call ReadLineIntoListView.
The first routine looks like this:
|
Notice it dynamically creates a TStringList object (a convenient object to manage an arbitrary number of strings) to hold the entire CSV file, which is loaded using the massively helpful LoadFromFile method. The actual file name is returned by GetCSVFileName, which we will look at in a moment. Each line is in CSV format and holds a record describing a product on the cover disk. It is loaded into the list view by being passed into ReadLineIntoListView.
One noteworthy point about a TStringList (and also its ancestor class, TStrings, from which it inherits) relates to how you read or write an individual string from/to it. The code above shows that you can use the Strings array property, however there is an alternative way of doing the same thing. In any class that has string properties, one of them will likely be declared as the default array property. If you treat the object itself as if it were an array, the compiler assumes you want to use the default array property; in other words the following two lines of code are functionally identical:
|
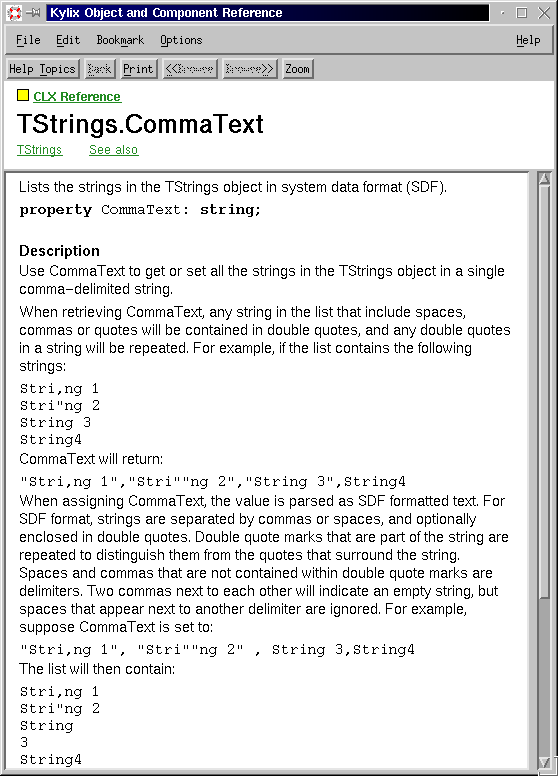
The code for ReadLineIntoListView can be found next. This routine takes a string (one line from the CSV file) and writes it to the CommaText property of another TStringList object (see Figure 7). CommaText is a handy property that does two jobs. When read from, the entire string list is returned in SDF (essentially comma-delimited) format; when written to it accepts an SDF string and splits all the fields into individual lines in the string list. This latter job conveniently turns the CSV line into individual strings, removing all commas and spurious quotes.
Figure 7: The useful CommaText property
|
Having done that a new list item (i.e. row) is added to the list view by calling the Add method of its Items object property, which we store a temporary reference to in the local Item variable. This allows us to access any properties of the list item we might wish to, such as its Caption (what's written in the first column) and its SubItems property (a TStrings object, which we use to add the other columns in).
Again, notice that the columns are not added in the same order as the fields in the file - the order for display starts with the name and description. A number of constants (including a typed array constant) are used to define the file field order and list view column order and translate a column into the corresponding file field.
Before moving onto the searching logic we should examine how the CSV file name is chosen. We decided that a file name could be passed as a command-line parameter to the application, although we need to take care as the application already supports the -ns command-line switch when compiled with Kylix Open Edition (it disables the Open Edition nag screen).
Additionally, if no file name is supplied on the command-line the application is designed to look in the current directory for any file with a .csv file extension. The first one found will be used, but if none are found an error message should be generated.
The implementation of GetCSVFileName can be found below. You can see the code checks for the -ns switch in a case-insensitive fashion (using CompareText, which we will see again shortly). Assuming -ns is not found, the code checks to see if any other specified command-line parameter exists as a file (the parameter can include a path if required). If a passed file name is located the code jumps straight out of the routine using Exit.
|
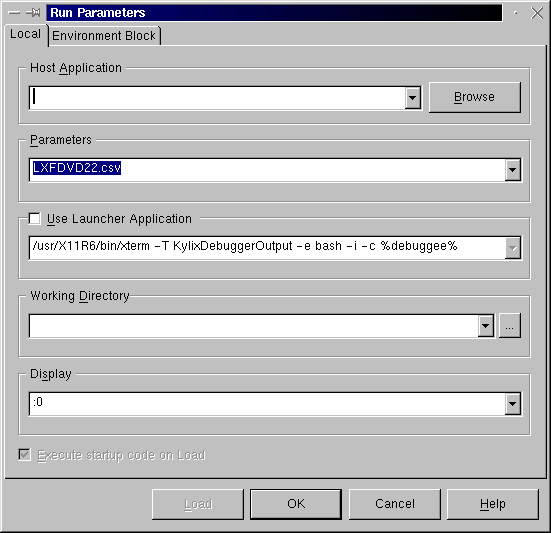
To test command-line parameters in the Kylix IDE you should be aware of the Run | Parameters... dialog (see Figure 8). As you see there is a Parameters field that lets you specify any required parameters (as well as a host of other settings we don't need to worry about right now).
Figure 8: Setting up command-line parameters in the Kylix IDE
If no file name was passed on the command-line the routine moves on to use FindFirst. FindFirst uses a TSearchRec record to keep track of how it got on and is usually used in conjunction with FindNext, but in this case we only want the first occurrence. However, assuming FindFirst indicates it found a file (by returning 0) you are obliged to tidy up resources used in the search record by passing it to FindClose when you are done.
If no file can be found by searching the current directory the code raises an exception to highlight the problem. We haven't looked at error handling in this tutorial series so far, but we will get there one of these months. This particular syntax is raising an exception that is designed to describe some sort of file opening problem.
The form's OnCreate event handler is shown next. You can see the GetCSVFileName routine being called and its resultant file name being passed to ReadFileIntoListView. The remaining code specifies which column of the list view should be initially sorted (the disk location column in this case) and sets the Sorted property to True to act on it.
|
Earlier, whilst building up the UI of the form, we mentioned that the three edit controls would all use the same code to search in the three most interesting columns. Each edit control will use the same event handler for its OnChange event so that any key press in any of the edit controls will immediately locate the closest item in the list view.
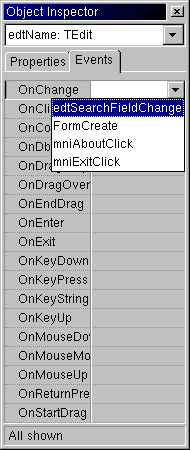
To set this up double-click the first edit control. This makes an OnChange handler called edtNameChange. To make this event handler look more like a shared event handler, use the Object Inspector's Events page to rename it to edtSearchFieldChange.
Now select each of the other edit controls (either individually or both together) and use the drop down arrow on the Events page of the Object Inspector next to the OnChange event to share the event handler among the other two events (as shown in Figure 9).
Figure 9: Sharing an event handler among different events
The code for this shared event handler is quite trivial in that it simply trims any excess white space from around the edit controls' content and passes them to the more involved LocateItems method:
|
LocateItems loops through each item in the list view checking each field that the user entered search criteria for, looking for a match. This is done using the MatchFound helper function that has two implementations (one is commented out). The active code uses the CompareText function to do a simple case-insensitive string comparison to see if the n characters entered by the user match the first n characters in the field. The Copy function is used to extract these characters from the field before comparison. CompareText returns 0 if there is a match so MatchFound returns the result of a Boolean comparison between the function result and 0 (if a match is found, CompareText returns 0 so the Boolean comparison will be True, so MatchFound returns True).
The inactive version, which you can switch to if you prefer, is more flexible in that it returns True if the user's entered text appears anywhere in the CSV field. Pos is case sensitive so the two values are upper-cased first. Pos then returns that character position that the passed in substring appears in the CSV field. Kylix strings start at character position 1.
You can find more information about these routines in the help, but note that if you are interested in dealing with international character sets you should use AnsiCompareText instead of CompareText and AnsiPos instead of Pos.
Notice that the code calls the BeginUpdate method of the list view's Items object property at the start of the LocateItems method and EndUpdate at the end. The purpose of this is to tell the list view that we are planning to do a number of updates to the control and for it not to reflect any of these changes until we are done. Things can get very flickery on the screen if every single change to a control is drawn on the screen - much better to have one redraw after doing what could be a lot of operations with visual side effects.
Each time a match for all appropriate criteria is found the item is selected and a count variable is incremented, otherwise the item is deselected (in case it was selected by a previous search). The first item found is also focused, meaning the list view will automatically scroll it into view, ensuring the user can see at least one selected item.
After each item is checked the results label is updated to show many items were found.
The final thing to cover is the File | Open... menu item. When chosen it needs to present a dialog to the user allowing them to choose a new CSV file to browse/search through. Assuming the user does not cancel the dialog the list view needs to be cleared and the file read into it in much the same way as the original file.
An open dialog component is required for this (called dlgOpenCSV). Set its properties to:
DefaultExt = .csv
Filter = Index files (*.csv)|*.csv
Title = Open Index File
The code for the menu item OnClick event handler should look like the following listing. The only noteworthy thing in the listing is the last statement, which reapplies the search criteria in the edit controls to the newly loaded file. This is done by directly calling the method that acts as the shared edit event handler. Since this particular event handler pays no attention to the Sender parameter (which normally refers to the component whose event is firing) it is okay to pass nil as its value.
|
With the application complete and on the cover disk, that's it for this month. The application shows a number of useful Kylix techniques:
Next month we'll look at more useful Kylix techniques.
Brian Long used to work at Borland UK, performing a number of duties including Technical Support on all the programming tools. Since leaving in 1995, Brian has spent the intervening years as a trainer, trouble-shooter and mentor focusing on the use of the C#, Delphi and C++ languages, and of the Win32 and .NET platforms. In his spare time Brian actively researches and employs strategies for the convenient identification, isolation and removal of malware.
If you need training in these areas or need solutions to problems you have with them, please get in touch or visit Brian's Web site.
Brian authored a Borland Pascal problem-solving book in 1994 and occasionally acts as a Technical Editor for Wiley (previously Sybex); he was the Technical Editor for
Mastering Delphi 7
and
Mastering Delphi 2005
and also contributed a chapter to Delphi for .NET Developer Guide
.
Brian is a regular columnist in The
Delphi Magazine and has had numerous articles published in Developer's Review,
Computing, Delphi Developer's Journal
and EXE Magazine. He was nominated for the Spirit
of Delphi 2000 award.