Using the Google MapView in Android with Oxygene for Java

Brian Long Consultancy & Training Services Ltd.
January 2012

Page selection: Previous  Next

Oxygene

Custom map overlays

We can also implement our own overlays, drawing what we want on the map. Let's make a custom overlay that draws a circle similar to the one drawn by MyLocationOverlay. Also, to make it interesting we'll have it draw the circle centred around our current detected location and have a radius governed by the current location's accuracy.

Normally when looking at this kind of goal we'd involve the LocationManager class and check for availability of network or GPS location providers, set up the LocationListener interface and add code to an override of the onLocationChanged() method, all of which is discussed in the Obtaining User Location section of the Android SDK Dev Guide. To keep things simple in this example, however, we'll take advantage of the fact that the MyLocationOverlay class already does all of that for us. We'll use a MyLocationOverlay but not have it display the current location or its compass, and instead just use its own onLocationChanged() method as the place to set up the custom overlay on the map.

Before worrying about how we'll shoe-horn our custom overlay into the MyLocationOverlay, here's the custom overlay class. It has a constructor that stores the centre coordinates, radius and colour, and a draw() method override to render the circle onto a supplied canvas. This takes the centre coordinates and turns them into a microdegree-based GeoPoint, then uses the map's Projection to locate the pixel position of that point on the map. Next the circle radius in metres is converted into a number of pixels on the map by first identifying how big it would be at the equator and then using some trigonometry to take into account the curved earth surface and whereabouts the point actually is. After this a transparent filled circle is drawn, followed by a solid circle to show the circle's edge clearly.

  1. namespace com.blong.googleapi.map;
  2.  
  3. interface
  4.  
  5. uses
  6.   android.content,
  7.   android.graphics,
  8.   com.google.android.maps;
  9.  
  10. type
  11.   /// <summary>
  12.   /// Custom overlay that draw a circle on the map centered at a given point with a given colour
  13.   /// </summary>
  14.   CircleOverlay = public class(Overlay)
  15.   private
  16.     var lat: Double;
  17.     var lon: Double;
  18.     var circleRadius: Double;
  19.     var circleColour: Integer;
  20.   protected
  21.   public
  22.     //This takes the radius in metres
  23.     constructor(latitude, longitude, radius: Double; colour: Integer);
  24.     method draw(overlayCanvas: Canvas; map: MapView; shadow: Boolean); override;
  25.   end;
  26.  
  27. implementation
  28.  
  29. constructor CircleOverlay(latitude, longitude, radius: Double; colour: Integer);
  30. begin
  31.   inherited constructor;
  32.   lat := latitude;
  33.   lon := longitude;
  34.   circleRadius := radius;
  35.   circleColour := colour;
  36. end;
  37.  
  38. method CircleOverlay.draw(overlayCanvas: Canvas; map: MapView; shadow: Boolean);
  39. begin
  40.   inherited;
  41.   var proj := map.Projection;
  42.   var pt := new Point;
  43.   var geo := new GeoPoint(Integer(lat * 1E6), Integer(lon * 1E6));
  44.   proj.toPixels(geo, pt);
  45.   //Get pixel value based on zoom level and corrected for height above/below the equator
  46.   var actualRadius := proj.metersToEquatorPixels(circleRadius) / Math.cos(Math.toRadians(lat));
  47.  
  48.   //Do very transparent solid circle
  49.   var circlePaint := new Paint;
  50.   circlePaint.Color := (circleColour and $00FFFFFF) or $0F000000;
  51.   circlePaint.Style := Paint.Style.FILL;
  52.   overlayCanvas.drawCircle(pt.x, pt.y, actualRadius, circlePaint);
  53.  
  54.   //Now do thin, solid circle border
  55.   var borderPaint := new Paint;
  56.   borderPaint.AntiAlias := true;
  57.   borderPaint.Color := circleColour or $FF000000;
  58.   borderPaint.Style := Paint.Style.STROKE;
  59.   borderPaint.StrokeWidth := 1;
  60.   overlayCanvas.drawCircle(pt.x, pt.y, actualRadius, borderPaint)
  61. end;
  62.  
  63. end.

The activity remains pretty much the same as before, although we ignore the compass and avoid adding the MyLocationOverlay descendant into the map view's Overlays array. So that just leaves the MyLocationOverlay that we're using to do the heavy lifting with regard to getting location updates:

  1. namespace com.blong.googleapi.map;
  2.  
  3. interface
  4.  
  5. uses
  6.   android.content,
  7.   android.location,
  8.   android.graphics,
  9.   android.util,
  10.   com.google.android.maps;
  11.  
  12. type
  13.   MyGoogleMapLocationOverlay2 = public class(MyGoogleMapLocationOverlay)
  14.   private
  15.     const Tag = 'MyGoogleMapLocationOverlay2';
  16.     var customLocationOverlay: CircleOverlay;
  17.     var locMgr: LocationManager;
  18.   public
  19.     constructor (aContext: Context; aMapView: MapView);
  20.     method onLocationChanged(loc: Location); override;
  21.   end;
  22.  
  23. implementation
  24.  
  25. constructor MyGoogleMapLocationOverlay2(aContext: Context; aMapView: MapView);
  26. begin
  27.   inherited;
  28.   locMgr := LocationManager(ctx.SystemService[Context.LOCATION_SERVICE]);
  29. end;
  30.  
  31. method MyGoogleMapLocationOverlay2.onLocationChanged(loc: Location);
  32. const
  33.   CircleRadius = 0.25; //miles
  34.   MperMile = 1609.344;
  35. begin
  36.   inherited;
  37.   //Ignore locations from the network provider if the GPS provider is active
  38.   if locMgr.isProviderEnabled(LocationManager.GPS_PROVIDER) and
  39.      (loc.Provider = locMgr.Provider[LocationManager.NETWORK_PROVIDER]) then
  40.     exit;
  41.   Log.i(Tag, 'onLocationChanged: ' + loc.Provider);
  42.   if customLocationOverlay <> nil then
  43.   begin
  44.     var idx := map.Overlays.indexOf(customLocationOverlay);
  45.     if idx <> -1 then
  46.       map.Overlays.remove(idx);
  47.   end;
  48.   //Set up a base circle of 1/4 mile
  49.   var radius := CircleRadius * MperMile;
  50.   //if the location contains accuracy data we'll use that instead as a radius
  51.   if loc.hasAccuracy then
  52.   begin
  53.     radius := loc.Accuracy;
  54.     Log.i(Tag, WideString.format('Accuracy attained = %f', loc.Accuracy));
  55.   end;
  56.   customLocationOverlay := new CircleOverlay(loc.Latitude, loc.Longitude,
  57.     radius, Color.BLUE);
  58.   map.Overlays.add(customLocationOverlay);
  59. end;
  60.  
  61. end.

The constructor gets hold of an Android LocationManager so that the onLocationChanged() method can choose to ignore any location updates coming from the network provider if it's know that the more accurate GPS provider is active. If we have already created a custom overlay, this is located in the map's overlay list and then removed so that we can create a new custom overlay with the newly identified location and add that instead. On the off-chance that the supplied location has no accuracy information we use a fallback value of ¼ mile, then the location, the circle radius and our chosen circle colour are passed into the custom overlay constructor.

That's about all there is to it. With my GPS unit turned off the custom overlay looks like this after on or two location updates from the network provider:
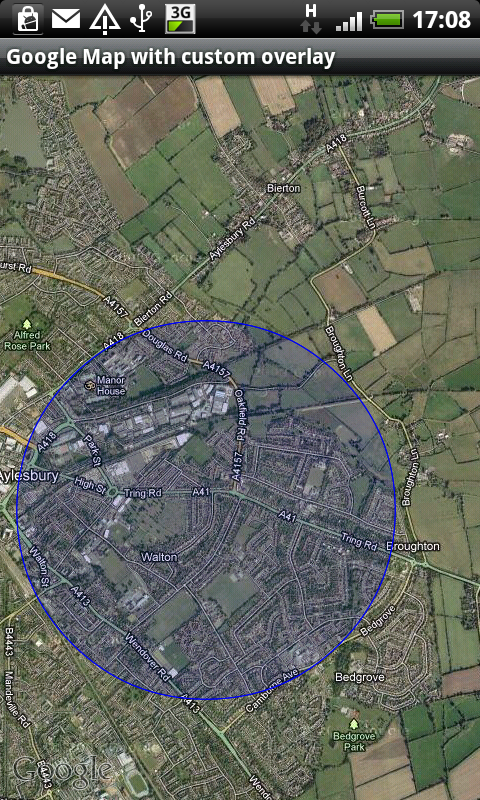
A custom Google map overlay

Itemised map overlays

The final type of overlay we'll look at here is an itemised overlay. This is an overlay that can display a collection of markers (or overlay items) on the map. The Google maps library provides a base class for an itemised overlay called ItemizedOverlay, which has some abstract methods we must override.

We'll do much the same as the short map tutorial Hello, MapView from the Android SDK Dev Guide. This involves creating a simple descendant of ItemizedOverlay that manages the overlay items in an array list and overrides createItem() and size() accordingly. The overlay items (items of type OverlayItem) are set up to store a title and a snippet of text along with a location, all passed into the constructor. You'll see in the code below that we also override onTap() so that when one of the markers on the map (an overlay item) is tapped we display a dialog that uses the title and text snippet.

  1. namespace com.blong.googleapi.map;
  2.  
  3. interface
  4.  
  5. uses
  6.   java.util,
  7.   android.app,
  8.   android.content,
  9.   android.graphics.drawable,
  10.   com.google.android.maps;
  11.  
  12. type
  13.   /// <summary>
  14.   /// Simple itemised overlay implementation, as per:
  15.   /// http://developer.android.com/resources/tutorials/views/hello-mapview.html
  16.   /// This overlay allows us to add annotations, or markers, onto a map, where
  17.   /// Google calls each marker an overlay item. So an ItemizedOverlay is really a
  18.   /// collection of individual overlay items.
  19.   /// </summary>
  20.   AnnotationOverlay = public class(ItemizedOverlay)
  21.   private
  22.     var mOverlays: ArrayList<OverlayItem> := new ArrayList<OverlayItem>;
  23.     var mContext: Context;
  24.   protected
  25.     method createItem(idx: Integer): OverlayItem; override;
  26.     method onTap(idx: Integer): Boolean; override;
  27.   public
  28.     constructor (defaultMarker: Drawable; ctx: Context);
  29.     method addOverlay(overlay: OverlayItem);
  30.     method removeOverlay(overlay: OverlayItem);
  31.     method size: Integer; override;
  32.   end;
  33.  
  34. implementation
  35.  
  36. /// <summary>
  37. /// Construct the itemised overlay
  38. /// </summary>
  39. /// <param name="defaultMarker">Default Drawable resource for each OverlayItem</param>
  40. /// <param name="ctx">The context that hosts the underlying MapView</param>
  41. constructor AnnotationOverlay(defaultMarker: Drawable; ctx: Context);
  42. begin
  43.   inherited constructor(boundCenterBottom(defaultMarker));
  44.   mContext := ctx;
  45. end;
  46.  
  47. /// <summary>
  48. /// Add a new OverlayItem
  49. /// </summary>
  50. /// <param name="overlay">OverlayItem to add to this ItemizedOverlay descendant</param>
  51. method AnnotationOverlay.addOverlay(overlay: OverlayItem);
  52. begin
  53.   mOverlays.add(overlay);
  54.   populate
  55. end;
  56.  
  57. /// <summary>
  58. /// Remove an existing OverlayItem
  59. /// </summary>
  60. /// <param name="overlay">OverlayItem to remove from this ItemizedOverlay descendant</param>
  61. method AnnotationOverlay.removeOverlay(overlay: OverlayItem);
  62. begin
  63.   var idx := mOverlays.indexOf(overlay);
  64.   if idx <> -1 then
  65.   begin
  66.     mOverlays.remove(idx);
  67.     populate
  68.   end
  69. end;
  70.  
  71. method AnnotationOverlay.createItem(idx: Integer): OverlayItem;
  72. begin
  73.   exit mOverlays[idx]
  74. end;
  75.  
  76. method AnnotationOverlay.size: Integer;
  77. begin
  78.   exit mOverlays.size
  79. end;
  80.  
  81. /// <summary>
  82. /// Do something when someone taps the marker on the map
  83. /// </summary>
  84. /// <param name="idx">The tapped OverlayItem's index in the list of OverlayItems</param>
  85. /// <returns></returns>
  86. method AnnotationOverlay.onTap(idx: Integer): Boolean;
  87. begin
  88.   var item := mOverlays.get(idx);
  89.   var dialog := new AlertDialog.Builder(mContext);
  90.   dialog.Title := item.Title;
  91.   dialog.Message := item.Snippet;
  92.   dialog.show;
  93.   exit true;
  94. end;
  95.  
  96. end.

For a simple itemised overlay that's all that is required: a place to store the overlay items. Supporting user interaction is entirely optional.

The activity that uses the itemised overlay sets up a default marker from a drawable resource in the project. A single overlay item is created that is given a coordinate, along with a title and some text. This overlay item is then added to the itemised overlay, which is added to the map view and the map view is then told to bring the location of the overlay item into view. The key bits of code are here:

  1. type
  2.   GoogleMapOverlay4Activity = public class(MapActivity)
  3.   private
  4.     var map: MapView;
  5.     var itemisedOverlay: AnnotationOverlay;
  6.     var marker: Drawable;
  7.     var annotation: OverlayItem;
  8.   public
  9.     method onCreate(savedInstanceState: Bundle); override;
  10.   end;
  11.  
  12. ...
  13.  
  14. method GoogleMapOverlay4Activity.onCreate(savedInstanceState: Bundle);
  15. begin
  16.   inherited;
  17.   ContentView := R.layout.googlemapactivity;
  18.   map := MapView(findViewById(R.id.mapView));
  19.   map.BuiltInZoomControls := true;
  20.   map.Satellite := true;
  21.   map.Controller.Zoom := 18;
  22.   marker := Resources.Drawable[R.drawable.androidmarker];
  23.   itemisedOverlay := new AnnotationOverlay(marker, self);
  24.   var point := new GeoPoint(Integer(37.422006 * 1E6), Integer(-122.084095 * 1E6));
  25.   annotation := new OverlayItem(point, 'Google lives here!', 'O HAI!!1! G009L3');
  26.   itemisedOverlay.addOverlay(annotation);
  27.   map.Overlays.add(itemisedOverlay);
  28.   map.Controller.animateTo(point);
  29. end;

Running up the application we now see this:
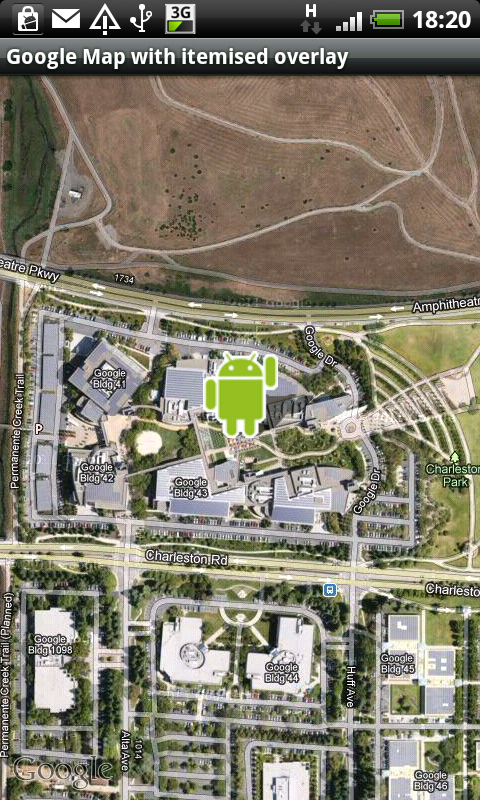
An itemised overlay on the map

As you might expect, tapping the marker on the map yields a dialog:
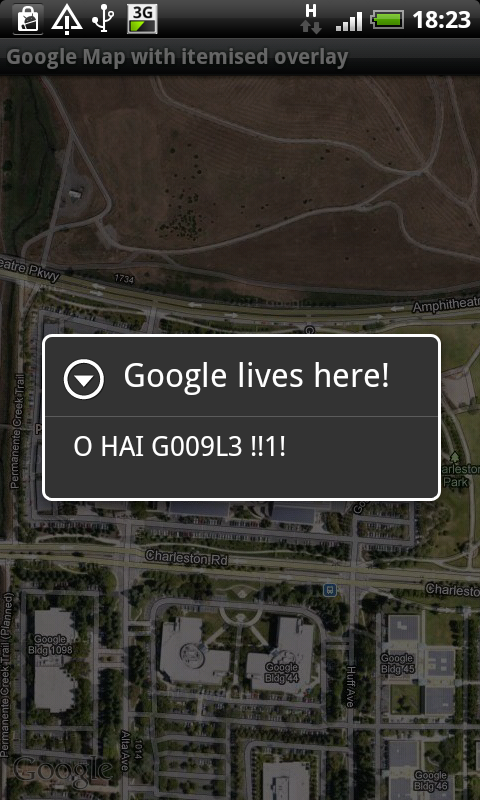
Tapping the itemised overlay

Footnote: Signing with JDK 7

If you are using the RTM release of Oxygene for Java, or a trial version, and are running on JDK 7 then you might conclude that it is not possible to custom-sign your Android application. This is because JDK 7's jarsigner defaults to using an SHA-256 digest algorithm where in fact the digest algorithm we require is SHA1. The Oxygene for Java RTM release doesn't have an option for choosing a digest algorithm. However this needn't be a terminal issue.

You have two options here. One is to simply uninstall JDK 7 and Java 7 and then install JDK 6 from the list of available JDK versions.

The other option is to build your applications using a batch file like the one below. This allows you to compile your project from the command-line using MSBuild, which will invoke the Oxygene command-line compiler. The commands specify that Oxygene should not Java-sign the Android package. The compilation is then followed by calls to jarsigner and zipalign to complete the build process, passing the appropriate parameters along. Finally the application is uninstalled from the attached device (assuming there is an attached device and a previous version of the app was installed) and the new version is then installed onto the device. If using the emulator substitute the -d option with -e instead.

Note: the batch file assumes that both the JDK bin directory (e.g. C:\Program Files\Java\jdk1.7.0_02\bin) and the Android SDK tools directory (e.g. C:\Android\android-sdk-windows\tools) are on the Windows PATH.

  1. set MSBUILD=%windir%\Microsoft.NET\Framework\v4.0.30319\MSBuild
  2.  
  3. set PACKAGE=com.blong.googleapi
  4. set CONFIG=Debug
  5. rem set CONFIG=Release
  6.  
  7. set LET_COOPER_SIGN=false
  8.  
  9. set KEYSTORE=Properties\googleapp.keystore
  10. set KEYSTORE_PASS=googleapp
  11. set KEY_PASS=googleapp
  12. set KEY_ALIAS=googleappkey
  13. set DIGEST_ALG=SHA1
  14.  
  15. %MSBUILD% %PACKAGE%.oxygene /property:Configuration=%CONFIG% /property:JavaSign=%LET_COOPER_SIGN% /property:JavaDigestAlgorith=%DIGEST_ALG%
  16.  
  17. if %LET_COOPER_SIGN% == true goto Install
  18.  
  19. jarsigner.exe -verbose -keystore %KEYSTORE% -storepass %KEYSTORE_PASS% -keypass %KEY_PASS% -digestalg %DIGEST_ALG% "bin\%CONFIG%\%PACKAGE%.apk" %KEY_ALIAS%
  20. if exist bin\%CONFIG%\%PACKAGE%_unaligned.apk del bin\%CONFIG%\%PACKAGE%_unaligned.apk
  21. ren bin\%CONFIG%\%PACKAGE%.apk %PACKAGE%_unaligned.apk
  22. zipalign -f -v 4 bin\%CONFIG%\%PACKAGE%_unaligned.apk bin\%CONFIG%\%PACKAGE%.apk
  23. if exist bin\%CONFIG%\%PACKAGE%_unaligned.apk del bin\%CONFIG%\%PACKAGE%_unaligned.apk
  24.  
  25. :Install
  26.  
  27. adb -d uninstall %PACKAGE%
  28. adb -d install -r bin\%CONFIG%\%PACKAGE%.apk
  29.  
  30. :Exit

The PACKAGE variable should be given a value matching your Android package name. This is basically your project name all in lower case, and can be found as the package attribute of the manifest element in your project's Android manifest file, or alternatively as the Archive name value on the Application page of the project options. Additionally you should set up all the details relating to your keystore in the available variables.

Summary

This article has looked in some detail at how you set about using Google's MapView control in an Android application as built with Oxygene for Java. It's by no means a simple process and various links and information in regular Android Java coverage have got out of date, hampering the process of working out what needs to be done. And then Java 7 came along and made some of the aspects even more prone to going wrong. Hopefully the attention to detail in this coverage is sufficient to help clear the muddied waters on the subject and allow Oxygene for Java developers to readily add mapping capabilities into their Android applications.

Oxygene

Comments

If you wish to make any comments on this article, your best options are to comment on the blog post that announced it, use the Contact Me form or email me at .


About the author

Brian Long has spent the last 1.6 decades as a trainer, trouble-shooter and mentor focusing on the Delphi, Oxygene, C# and C++ languages, and the Win32, .NET and Mono platforms, recently adding iOS and Android onto the list. In his spare time, when not exploring the Chiltern Hills on his mountain-bike or pounding the pavement in his running shoes, Brian has been re-discovering and re-enjoying the idiosyncrasies and peccadilloes of Unix-based operating systems. Besides writing a Pascal problem-solving book in the mid-90s he has contributed chapters to several books, written countless magazine articles, spoken at many international developer conferences and acted as occasional Technical Editor for Sybex. Brian has a number of online articles that can be found at http://blong.com and a blog at http://blog.blong.com.

© 2012 Brian Long Consulting and Training Services Ltd. All Rights Reserved.


Go back to the top of this page

Go back to start of this article

Previous page

Next page